Hey dear blog reader, if you are using a download blogger site then you need to use a countdown button to control your website bouns rate. In this article, I will show you how can we put an awesome countdown download box in your blogger post.

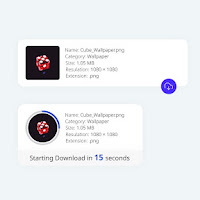
So, today we are able to make a download container with a countdown timer for the blogger internet site. while customers will click on the download button, a countdown will start before the download starts off evolved.
How to make a Countdown Download Box?
Important!
Before we start adding codes in XML, I will recommend you to take a Backup of
your current theme.
By chance if any problem occurs, you can restore it later.
Step 01: First of all Login to your Blogger Dashboard.
Step 02: On Blogger Dashboard, click Theme.
Step 03: Click the next to 'customize' button.
Step 04: Click Edit HTML you will be redirected to editing page.
Step 05: Now search the code ]]></b:skin> and
paste the following CSS codes just above to it.
If your template has a dark mode feature, and if you want a different color when in dark mode, you can customise the codes as per your need. Each template can have a different dark mode class, so please adjust it, you can replace the marked class with your template dark mode class.
.dldCo{
  --boxC : #08102b; /* Font Color */
  --boxBg : #fffdfc; /* Container Background */
  --fontF : inherit; /* Font Family */
  --svgS : #fffdfc; /* Button SVG Stroke */
  --btnBg : #482dff; /* Button Background */
  --darkC : #fffdfc; /* Dark Font Color */
  --darkBt : #e91e63; /* Dark Button Background */
  --darkBa: #2d2d30; /* Dark Background Alt */
  --darkBs: #252526 ; /* Dark Background Sec */
}

.dldCo{-webkit-tap-highlight-color:transparent;position:relative;width:100%;max-width:480px;margin:30px 0;color:var(--boxC);font-family:var(--fontF);transition:margin .6s ease;-webkit-transition:margin .6s ease}
.dldBx{position:relative;z-index:2;background:var(--boxBg);width:100%;padding:15px;display:flex;flex-direction:column;font-size:14px;border-radius:10px;box-shadow:0 0 35px rgba(0,0,0,.09)}
.dldTp{display:flex;flex-direction:row} .dldIm{position:relative;flex-shrink:0;display:flex;align-items:center;justify-content:center;width:60px;height:60px;padding:10px;margin-right:15px;background:rgba(0,0,0,.08);border-radius:6px;transition:all .4s ease;-webkit-transition:all .4s ease} .dldIm::before{content:attr(data-text);opacity:.7} .dldIm[style]:not([style='']){width:100px;height:100px;background-size:cover;background-position:center;background-repeat:no-repeat;box-shadow:0 0 10px rgba(0,0,0,.1)} .dldIm[style]:not([style=''])::before{display:none}
.dldSv{opacity:0;position:absolute;width:calc(100% + 12px);height:calc(100% + 12px);top:-6px;bottom:-6px;right:-6px;left:-6px;-webkit-transform:rotate(-90deg);-ms-transform:rotate(-90deg);transform:rotate(-90deg);stroke-width:1.5;transition:all .5s ease;-webkit-transition:all .5s ease} .dldIm[style]:not([style='']) .dldSv{width:calc(100% + 20px);height:calc(100% + 20px);top:-10px;bottom:-10px;right:-10px;left:-10px} .dldSv .b{fill:none;stroke:#e6e6e6;opacity:.9} .dldSv .c{fill:none;stroke:var(--btnBg);stroke-dasharray:100 100;stroke-dashoffset:100;stroke-linecap:round;transition:all .5s ease;-webkit-transition:all .5s ease}
.dldIn{flex-grow:1;width:calc(100% - 115px)} .dldIn >*{line-height:20px;font-size:14px;display:block;white-space:nowrap;overflow:hidden;text-overflow:ellipsis} .dldIn >*::before{content:attr(data-text) ': ';opacity:.8}
.dldBt{background:var(--btnBg);position:absolute;width:40px;height:40px;bottom:-20px;right:20px;outline:none;border:none;border-radius:50%;display:flex;align-items:center;justify-content:center;box-shadow:0 0 15px rgba(0,0,0,.09);transition:all .3s ease;-webkit-transition:all .3s ease;cursor:pointer} .dldBt:hover{-webkit-transform:scale(1.03);-ms-transform:scale(1.03);transform:scale(1.03)} .dldBt svg{width:24px;height:24px;fill:none;stroke:var(--svgS);stroke-linecap:round;stroke-linejoin:round;stroke-width:1.2} .dldBt.dldDl{visibility:visible;opacity:1} .dldBt.dldRt{visibility:hidden;opacity:0;bottom:-40px}
.dldSl{z-index:1;position:absolute;bottom:0;height:60px;width:100%;background:var(--boxBg);border-radius:0 0 10px 10px;transition:all .6s ease;-webkit-transition:all .6s ease} .dldMe{position: absolute;width:100%;height:40px;bottom:0;display:flex;align-items:center;justify-content:center;font-size:14px} .dldMe span{color:var(--btnBg);font-size:18px;font-weight:600;margin:0 5px}
.dldCo.dldAlt{margin:30px 0 70px} .dldCo.dldAlt .dldIm{-webkit-transform:scale(.8);-ms-transform:scale(.8);transform:scale(.8);border-radius:50%} .dldCo.dldAlt .dldSv{opacity:1} .dldCo.dldAlt .dldDl{visibility:hidden;opacity:0;bottom:-40px} .dldCo.dldRty .dldRt{visibility:visible;opacity:1;bottom:-20px} .dldCo.dldAlt .dldSl{bottom:-40px;box-shadow:0 0 35px rgba(0,0,0,.09)}
.darkMode .dldCo{color:var(--darkC)} .darkMode .dldBx{background:var(--darkBs)} .darkMode .dldIm, .darkMode .dldSl{background:var(--darkBa)} .darkMode .dldSv .b{stroke:#404045} .darkMode .dldSv .c{stroke:var(--darkBt)} .darkMode .dldBt{background:var(--darkBt)} .darkMode .dldMe span{color:var(--darkBt)}
Step 06: Now add the following JavaScript just above to
</body> tag. If you don't find it, it is probably already
parsed which is </body>.
<script>
  /*<![CDATA[*/
  function download(link, time, newtab, id){
    var dldCo = document.querySelector(id),
        dldMe = document.querySelector(id + ' .dldMe'),
        dldPg = document.querySelector(id + ' .dldPg'),
        dldDl = document.querySelector(id + ' .dldDl'),
        dldRt = document.querySelector(id + ' .dldRt'),
        dldLf = time;

    dldMe.innerHTML = 'Starting Download in <span>' + dldLf + '</span> seconds...';
    dldCo.classList.add('dldAlt');

    var downloadTimer = setInterval(function timeCount(){
        dldLf -= 1;
        dldMe.innerHTML = 'Starting Download in <span>' + dldLf + '</span> seconds...';
        dldPg.style.strokeDashoffset = Math.floor((dldLf / time) * 100);

      if(dldLf <= 0){
        clearInterval(downloadTimer);
        dldMe.innerHTML = 'Please wait...';

        if (newtab == 'true'){
          window.open(link, '_blank');
        } else {
          window.location.href = link;
        };

        dldRt.onclick = function (){
          if (newtab == 'true'){
            window.open(link, '_blank');
          } else {
            window.location.href = link;
          }
        };

        setTimeout(() => {
          dldCo.classList.remove('dldAlt');
          dldCo.classList.add('dldRty');
        }, 4000);
      }
    }, 1000);
  };
  /*]]>*/
</script>
Step 07: Save the changes by clicking on this icon
Step 08: That's done! Add the following HTML codes in your blog posts through HTML view to add Countdown Download Box.
<div class='dldCo' id='download1'>
  <div class='dldBx'>
    <div class='dldTp'>
      <div class='dldIm' data-text='.png' style='background-image:url( image_url_here )'>
        <svg class='dldSv' viewBox='0 0 34 34'>
          <circle class='b' cx='17' cy='17' r='15.92' />
          <circle class='c dldPg' cx='17' cy='17' r='15.92' />
        </svg>
      </div>
      <div class='dldIn'>
        <span data-text='Name'> Music_Wallpaper.png </span>
        <span data-text='Category'> Music </span>
        <span data-text='Size'> 3.05MB </span>
        <span data-text='Resolution'> 1920×1080 </span>
        <span data-text='Extension'> .png </span>
      </div>
    </div>
    <button onclick='download("#", "10", "false", "#download1")' class='dldBt dldDl'><svg viewBox='0 0 24 24'><polyline points='8 17 12 21 16 17'/><line x1='12' x2='12' y1='12' y2='21'/><path d='M20.88 18.09A5 5 0 0 0 18 9h-1.26A8 8 0 1 0 3 16.29'/></svg></button>
    <button class='dldBt dldRt'><svg viewBox='0 0 24 24'><polyline points='23 4 23 10 17 10'/><path d='M20.49 15a9 9 0 1 1-2.12-9.36L23 10'/></svg></button>
  </div>
  <div class='dldSl'>
    <div class='dldMe'></div>
  </div>
</div>
You need to change these highlighted texts according to your downloadable file information.
Video Tutorial
Conclusion
This is all about creating a Countdown Download Box for Blog Posts. I hope you enjoy this article. Please do share this article. And if you are facing problem in any section or you have any question then ask us in comment box.
Bookmark This Blogger: Blog Brackets